




Green Chile Queso
This Green Chile Queso is smooth, creamy and ready in about 20 minutes when made with canned green chiles. If you’re roasting fresh chiles, plan on about 45 minutes from start to finish.
Serve it with crispy tortilla chips, fresh vegetables or warm tortillas.
Here are a few more of my popular queso recipes: Smoked Queso, Rotel Dip, Salsa Con Queso, Queso Blanco Dip and Choriqueso. You can also browse all of my queso recipes for even more variations.

Hatch Queso
Hatch green chiles are my first choice for this queso because of their earthy flavor and mild-to-medium heat. Their season is short, so Anaheim or poblano peppers are good substitutes when fresh Hatch chiles aren’t available.
Use any leftover green chiles to make my Green Chile Macaroni and Cheese.
Of course, you can grab a can of green chiles next time at the grocery store to save yourself 20 minutes in the kitchen.

Ingredients
Here are the main ingredients needed to make this green queso dip, and substitution ideas. For the full list of ingredients, see the recipe card below.
- Green Chiles – Fresh Hatch chiles are my first choice, but canned green chiles work when Hatch chiles aren’t in season.
- Cheese – I use a combination of Monterey Jack and Pepper Jack for a smooth melt with a little heat. Other good options include Oaxaca, Asadero and Chihuahua cheese. See my best cheese for queso guide for more options.
- White Onion – if you don’t care for onions, you can omit or sub in onion powder.
- Garlic – If you don’t have a garlic clove or two, go ahead and sub in garlic powder.
- Flour – combines with the oil to create a quick roux, which helps thicken the queso.
- Evaporated Milk – this is used to melt the cheese and thin out the queso.
For serving: Besides tortilla chips and veggies, try serving it with pork rinds, crackers, baguette slices, pretzel bites or pita chips.

How to Make Green Chile Queso
Here’s a step-by-step guide to making Hatch Green Chile Queso. For the full recipe, see the recipe card below.
Roast the Hatch Green Chiles – broil the pepper in the oven for 20 minutes until the skins are blackened and blistered. Remove the skin and chop the chiles. Here’s a more in depth article about How To Roast Peppers.

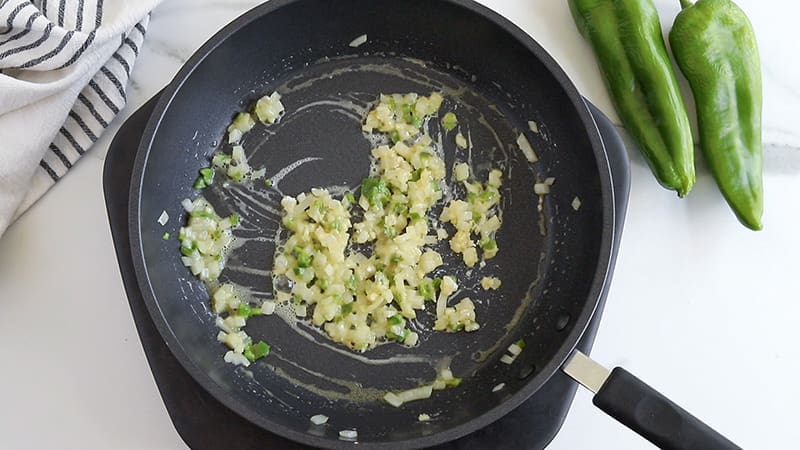
Prepare the Peppers and Roux – sauté the onions, jalapeño, and garlic in a cast iron skillet or medium saucepan over medium heat. Sprinkle flour over the top and cook for 3-5 minutes to create a quick roux.
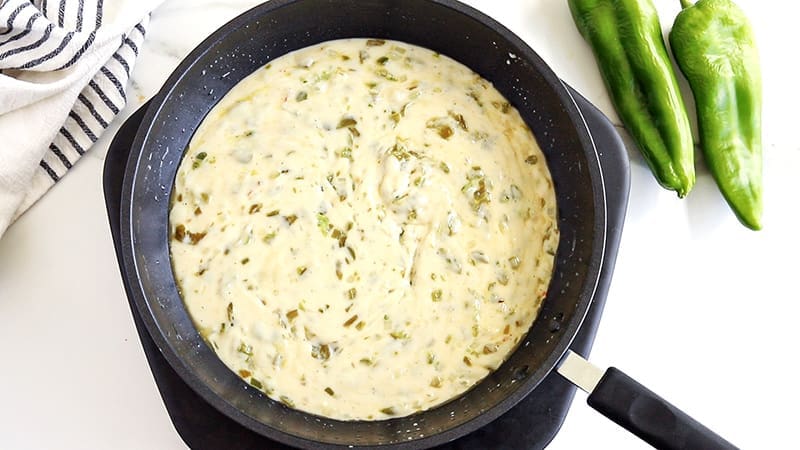
Create the Cheese Sauce – slowly whisk in the evaporated milk followed by the cheese. Keep the temperature nice and low so the cheese doesn’t become gritty. The cheese sauce will be thick at this point.
Incorporate the Chiles – stir in the chopped green chiles and thin out with milk, if desired.
Serve – Remove from the heat and garnish with fresh cilantro and green onions.
Cheese Options
Keep it simple, or use a blend of two or more when making a green chile queso dip recipe.
- Oaxaca Cheese: A mild, stringy cheese with a creamy texture that melts beautifully.
- Queso Asadero: A mild, smooth cheese that melts easily.
- Queso Chihuahua: A mild, buttery cheese that melts well and adds a rich, creamy texture.
- Pepper Jack Cheese: A very popular option since it melts well and adds a kick.
- Monterey Jack Cheese: A semi-soft cheese that’s mild in flavor and melts smoothly, adding a creamy consistency to the dip.
- Mozzarella: A readily available cheese with a neutral flavor and excellent melting properties. It’s a stringy cheese and provides a nice “cheese pull.”
- Cheddar Cheese: I don’t love using cheddar cheese for homemade queso, but it does work in a pinch. It doesn’t melt quite as well and is super greasy when melted.
- Cream Cheese: Add 3-4 oz. on top of what’s called for in the recipe card. It’s not meant to be used solo, or in abundance, but a little bit adds a nice tangy flavor and creaminess.
To keep the queso smooth and creamy, it is important to control the heat and cheese blend. Learn how to keep queso smooth, why queso turns grainy, and how to fix it if needed.
Not sure which cheese to use? My Ultimate Guide to Queso covers the best cheeses for queso, tips for getting a smooth texture, common problems and more queso recipes to try.

Serving Ideas and Uses
Queso isn’t just a dip! You can use it as an element in many other different recipes, especially Mexican recipes. Here are some ideas:
- Taco Recipes – Make a queso taco! Tuck the queso inside a warm corn tortilla, top it with homemade salsa, and serve.
- Carne Asada Recipes
- Queso Chicken Recipe
- Green Enchiladas (Green Chicken Enchiladas) or Enchilada Cups
- Cheese Quesadilla
- Mix it in smoked mac and cheese
If you’re building a party or game day spread, browse my dip recipes for more hot, cold and cheesy dips to serve alongside this green chile queso.
Most Important Cooking Tip
The most important part of this recipe is keeping the heat low. Freshly grated cheese can turn gritty when it’s heated too quickly, so don’t rush this step.
I remove the pan from the heat for about a minute between heating the milk and adding the cheese. This gives the pan a chance to cool slightly before the cheese goes in.

Tips From Darcey’s Kitchen
- A cast iron skillet is ideal as the cast iron retains heat for longer than a non-stick or aluminum skillet so that the queso will stay warm longer.
- You must shred the cheese! Do not buy pre-shredded cheese, as it doesn’t melt as well.
- Queso naturally thickens quickly as it cools. To avoid this, transfer the cooked queso dip to a slow cooker set to warm immediately after cooking.
Frequently Asked Questions
Hatch green chile queso isn’t spicy unless you add the jalapeño. For a mild queso, omit the jalapeño pepper. For an extra spicy version, add a pinch of chili powder or cayenne pepper.
To reheat queso, place it back on the stove over low heat for a few minutes. You can also microwave it for 60 seconds, stir, then continue in 30-second increments until warmed through.
Grainy queso usually means the cheese was added too quickly or at too high of a temperature. Add finely grated cheese gradually over low heat, stirring until smooth. See Why Is My Queso Grainy? for more troubleshooting tips and ways to fix it.

Would you like to save this?
Drink Pairing Recommendations
There are many drinks from Mexico that pair well with this hatch chile queso recipe. Here are my top recommendations:

Green Chile Queso
Equipment
Ingredients
- 3 fresh hatch chiles (or canned) (*Note 1)
- 2 tbsp olive oil
- ¼ cup minced white onion
- 1 small jalapeño, finely diced (*Note 2)
- 2 cloves garlic, minced
- 1 tbsp all purpose flour
- 13 oz evaporated milk
- ¼ tsp salt
- ⅛ tsp black pepper
- 3 cups melting cheese, shredded (*Note 3)
- optional: milk, to thin queso (*Note 4)
GARNISH AND SERVING IDEAS
- tortilla chips, bread or veggies, for serving
- chopped fresh cilantro or green onions, for garnish
Instructions
ROAST THE PEPPERS
- Place the oven rack in the top third of the oven and preheat to high broil. Place the green peppers on a baking sheet spaced about 1" apart. Roast for 10 minutes until the skin starts to blister and blacken. Flip and roast for another 10 minutes.
- Immediately transfer to a bowl and cover with foil to let steam. After 15-20 minutes, remove the skins and transfer to a cutting board. Use a sharp knife to remove the stems and seeds and mince. Set aside.
MAKE THE QUESO
- Heat olive oil in a medium-sized saucepan or cast iron skillet over medium heat. Add the onion and jalapeño and sauté until softened (approx. 4-5 minutes). Add the garlic and saute until fragrant (approx. 30-60 seconds). Sprinkle flour over the onion mixture, stir and cook for 2 minutes.
- Turn the heat to low. Stir in the evaporated milk, salt and black pepper and cook until thickened and heated through, about 3-5 minutes.
- Add cheese and stir until incorporated. It will be very thick. Stir in green chiles and stir until incorporated.
- To thin the queso, add in milk, 2 tbsp. at a time until your desired consistency is reached.
- Remove from the heat, top with cilantro or green onions and serve. To maintain the proper texture, transfer to a small slow cooker and keep on warm.